

 Writers don't often get the opportunity to create their own covers, and there are several good
reasons for that, chief among which are they can't, they don't want to, or it's not permitted by
the publisher. The latter of these reasons might seem unfair at first glance, but it generally makes
sense: writing and marketing are very different skills. Just because someone knows how to write a
book doesn't mean that they know how to sell it.
Writers don't often get the opportunity to create their own covers, and there are several good
reasons for that, chief among which are they can't, they don't want to, or it's not permitted by
the publisher. The latter of these reasons might seem unfair at first glance, but it generally makes
sense: writing and marketing are very different skills. Just because someone knows how to write a
book doesn't mean that they know how to sell it.
However, that doesn't stop some of us from trying! I tend to create graphics for most of the things I write, usually just as a distraction (working on something different gives my brain the chance to sort out story details in the background), but sometimes I use them to "sell" the idea to a publisher.
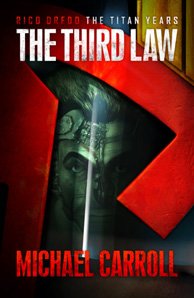
The cover for my e-novella Rico Dredd - The Titan Years: The Third Law came into being partly for the distraction factor as mentioned above, but also because the publishers - Rebellion - tend to re-use images, usually covers, from 2000AD and Judge Dredd Megazine for their novels. An example of this is the cover for my first Dredd e-novella The Cold Light of Day - the cover by Darren Douglas originally appeared on 2000AD #1815 (16th January, 2013). You can read all about the creation of Darren's cover on Pete Wells' excellent website 2000AD Covers Uncovered.
But I knew that approach wouldn't work for my Rico Dredd novella, because Rico hasn't appeared very much in the comics, and none of the drawings of him would be suitable for a cover. So I figured I'd give it a go myself.
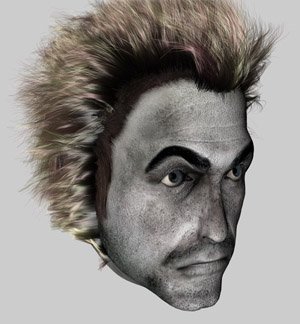
My first task was to figure out exactly what Rico looks like. (In the comics, and in my book, he starts out as a relatively normal-looking human but is later cybernetically modified to be better suited to life on Titan, one of Saturn's moons.) Luckily the co-creator of Rico, Mike McMahon, gave us a nice big close-up of Rico's modified face in his first appearance...

Now, I'm not a great artist by any stretch of the imagination, but I know my way around Photoshop and Cinema 4D so I can (sometimes!) create nice-looking pictures. The first step was to recreate Rico's head in 3D, using Mike McMahon's pic as a template.
To simplify the process, I started with the same head I created years ago for Judge Dredd:
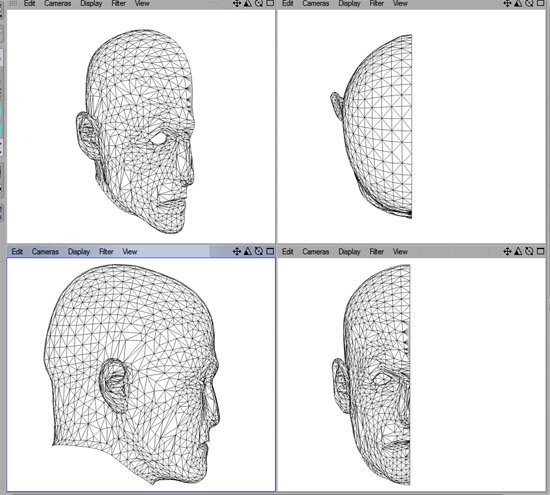
Only half of the head is here, as you can see: I chopped Dredd's head in half because I knew I wanted to make some tweaks to the basic shape, and there was no point in doing the same work on both sides. (You'll note that the nose is rather flat... This is to ensure that it'll fit under Dredd's helmet!)
 With the appropriate tweaks done, I mirrored the half-head to recreate the full thing, then tweaked
it a little more, because faces are never truly symmetrical.
With the appropriate tweaks done, I mirrored the half-head to recreate the full thing, then tweaked
it a little more, because faces are never truly symmetrical.
I then applied a very basic texture. Usually when texturing a head it's necessary to create a whole set of "UVW" coordinates to map the texture image onto the three-dimensional geometry (so that the texture doesn't slide around when the model is animated). The process is very time-consuming, but luckily it wasn't necessary in this case as I knew that there'd be no animation involved. Instead, the texture is cylindrically wrapped around the model in a similar manner to the label on a tin of beans... It's a lot simpler that way!
As for the texture itself: I wanted Rico's skin to be grey and mottled, so I started with a plain
concrete texture.
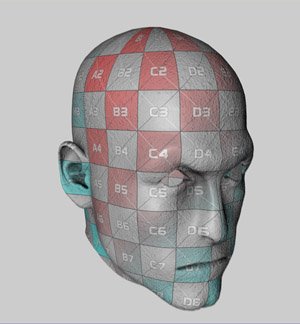 Although using a cylindrically-mapped texture is simpler than a UVW texture, it's still necessary to
get everything nicely lined up. Here, I've added a grid pattern to the texture so that I can see
where all the bits go.
Although using a cylindrically-mapped texture is simpler than a UVW texture, it's still necessary to
get everything nicely lined up. Here, I've added a grid pattern to the texture so that I can see
where all the bits go.
Just like the model itself, the texture is created by doing the major work on one half, then
mirroring it and applying the appropriate tweaks to the other half. Again, the grid helps with this
process.
 I've smoothed out much of the texture, added eyebrows, darkened around the eyes and added some
stubble.
I've smoothed out much of the texture, added eyebrows, darkened around the eyes and added some
stubble.
Getting the eyes right is one of the trickiest parts of texturing a face, and in Rico's case
it was particularly important since much of his face would be covered up by cybernetics, so
I had to do a lot of adjustments to his eyebrows before I was satisfied.
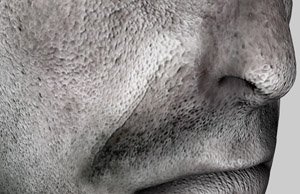
 Now it was time to move on to the skin itself. Though, as I said above, I wanted his skin to look
grey, that doesn't mean it should be entirely colourless. I took a skin texture and applied parts
of it over the concrete texture, then added dirt, blemishes, deeper pores, and much darker stubble.
Now it was time to move on to the skin itself. Though, as I said above, I wanted his skin to look
grey, that doesn't mean it should be entirely colourless. I took a skin texture and applied parts
of it over the concrete texture, then added dirt, blemishes, deeper pores, and much darker stubble.
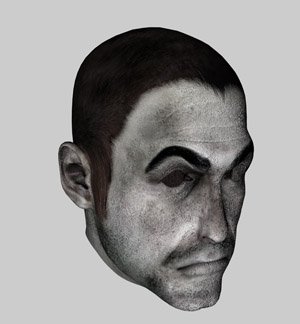 Here, I've added painted-on hair. I knew I was going to add "real" hair to the model, but there's
always the risk that the scalp will be partly visible through the real hair, so it's best to paint
on hair that's slightly darker than the real hair.
Here, I've added painted-on hair. I knew I was going to add "real" hair to the model, but there's
always the risk that the scalp will be partly visible through the real hair, so it's best to paint
on hair that's slightly darker than the real hair.
That's one of the key things about creating a three-dimensional model that'll primarily be used in
a two-dimensional image: know what you want to create before you start, and you won't waste time
working on the parts that will never be seen!
 With that done, it was time to add the hair and the eyes! I cheated here and re-used eyes from
another model... But the hair was a lot trickier to get right. The Hair function in Cinema 4D has
about a billion tweaking options and I understand almost seven of them.
With that done, it was time to add the hair and the eyes! I cheated here and re-used eyes from
another model... But the hair was a lot trickier to get right. The Hair function in Cinema 4D has
about a billion tweaking options and I understand almost seven of them.
As you can see, the edge of the "real" hair doesn't quite match up with the painted-on hair, but
that wasn't a big deal because I knew that in the final image we'd be looking at the head
straight-on, plus the cybernetics and shadows would cover up most of the edges.
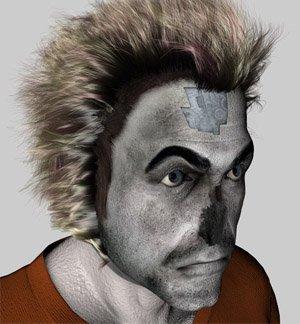 Here, I've added a neck and shoulders, plus I've lopped off Rico's nose and taken a chunk out of
his forehead to allow space for the cybernetic modifications.
Here, I've added a neck and shoulders, plus I've lopped off Rico's nose and taken a chunk out of
his forehead to allow space for the cybernetic modifications.
In the hole in his forehead I've added a simple mechanical-looking texture: this serves as a
background to the cybernetic gubbins that'll fill that hole. Again, there's no point in spending
too much time on something that'll only barely be visible in the finished image.
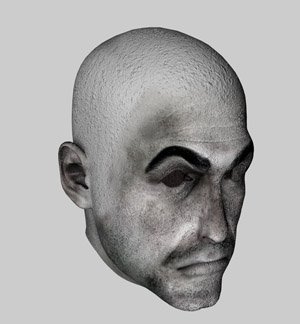
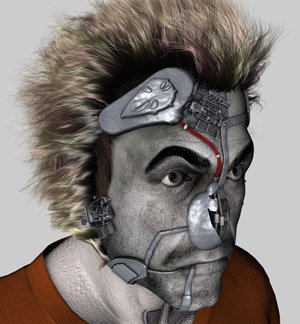 With the cybernetics added, he's finally starting to look like Mike McMahon's design.
The cybernetics took longer to put together than the rest of the model, but I'm not going to go
through all that step-by-step!
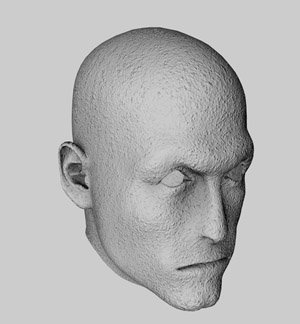
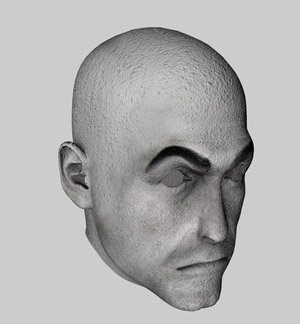
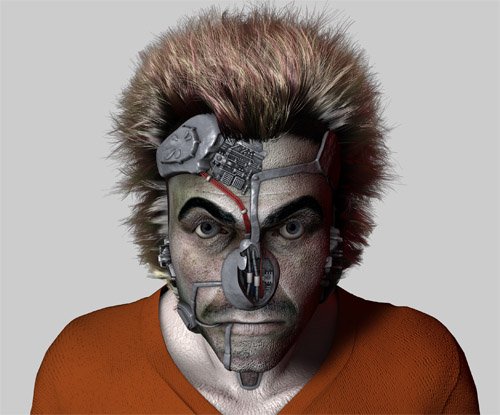
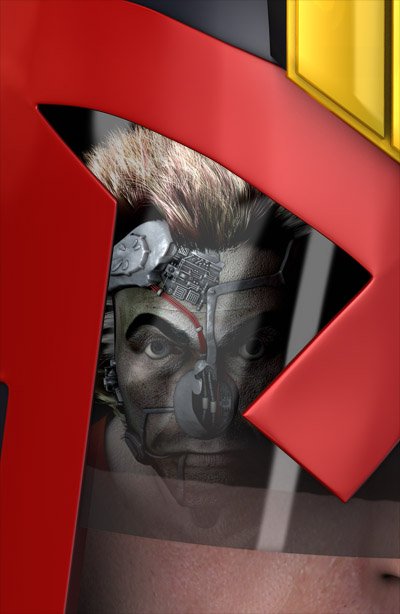
After a little more tweaking, here's the final head from the angle we require, with lighting and shadows added.
Next, it was time to work on the helmet. Luckily, I'd already created a Judge helmet so all I had to do was add Dredd's face and then zoom in appropriately.
I wanted Rico's face to be reflected in the helmet's visor, and I could have done this by making the visor reflective and placing Rico's head behind the camera... but I knew that wouldn't work. The visor is curved, which means that the reflection would appear squashed.
So I opted for the less realistic but more aesthetically pleasing choice of rendering the head and helmet separately, then combining the two images, and adding in a few highlights to the visor.
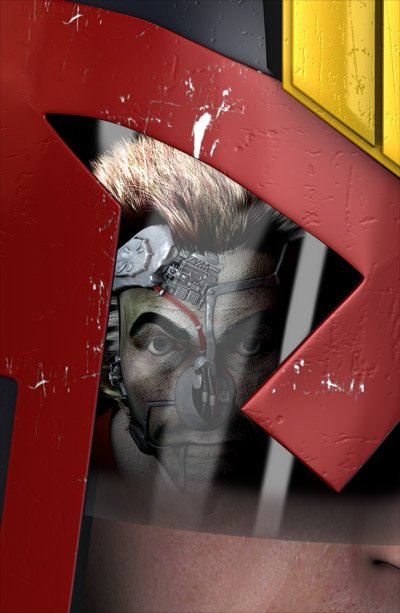
The helmet was much too clean and shiny, so I re-rendered it with some scratches and bumps to give it a more realistic and solid feel.
Having achieved pretty much what I wanted from the start, I was done. I sent the image to the good folk at Rebellion, basically telling them "Look what I made!"
This was where Rebellion's graphic designer Pye Parr stepped in: he liked the basic idea but felt that it could do with some changes to make it more dramatic. He adjusted the contrast and colour saturation, smoothed out some of the details on the helmet, and replaced the reflective highlights on the visor...
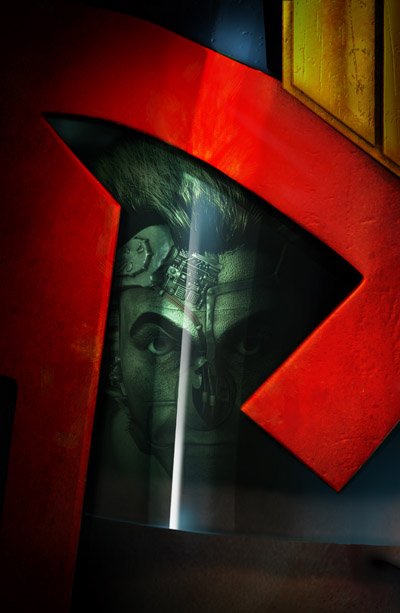
...And suddenly, the image that I had thought looked pretty cool was utterly transformed!
All of which just goes to show that an understanding of computer-generated imagery and some skills with Photoshop aren't a substitute for natural artistic talent!
